
Shining for Dummies
by Rhumstruck
This is presented for informational purposes only. Follow these directions at your own risk. I am not responsible for your actions!
This is the product of numerous discussions scattered around From The Trenches World Report. To date most of the information has been accurate and where it wasn't I have attempted to set the record straight. In doing so I have seen an interest in the subject and a lot of questions. There have been a couple articles and links to videos, yet I detected a reluctance to attempt something that has the bad reputation of blinding folks. I think it may be a sense of distrust in the information of anonymous somebody's.
I consider many of you my friends and hope that one day those that have not will get a chance to meet me, as I hope to meet you.
This should get ya in the mood:
https://www.youtube.com/watch?v=ecuKSOXAa24
That leads me to mentioning a couple of things. On the idiot box is a show called MOONSHINERS. I hate that damn show! It gives the impression that anyone can make a living on shine and introduces a ton of fictional drama. Maybe so, but realize that in the police state environment we live in what some old boy sees as a way to feed his family is viewed by TPTB as illegal. I have NEVER sold any and do not intend starting unless TSHTF in which case I'll have something to barter. And considering what shine sells for now, in a collapse of society it will be worth it's weight in SILVER!
LEGAL NOTICE
Owning a still is legal! Running the still is legal as long as you are only distilling water (you can distill river or pond water to purify it for drinking) or essential oils (on your own there, sorry.) Or you can apply for a permit to experiment with fuel alcohol and pay another unjust tax. I see no reason for all that ATF extortion shit. Making beer and wine is legal for personal consumption. Well hell, if you do that you have made a mash for moonshine, all distilling these LEGAL beverages does is concentrate the alcohol! Following that train of thought and the Fact the Constitution has nothing to say about it, if I want to make a little rhum or whiskey for personal consumption it's my business. Civil disobedience is the active, professed refusal to obey certain laws, demands, and commands of a government, or of an occupying international power. So leave me the fuck alone!
You have been duly informed. That should be enough disclaimer.
The Still
Since this idea took root I have been experimenting with little stills. My intention was to try to find the smallest still possible for even the most inept. The results have been interesting but not as friendly as some would probably like. I found that the smaller I went the more difficult it was to make my cuts (a term I'll explain shortly.) A one gallon still was a total waste of time. I have settled on 16 quarts (4 gallons) as the smallest still safely and easily usable for a stove top still. It's also the smallest still that produces enough quality alcohol to be useful.
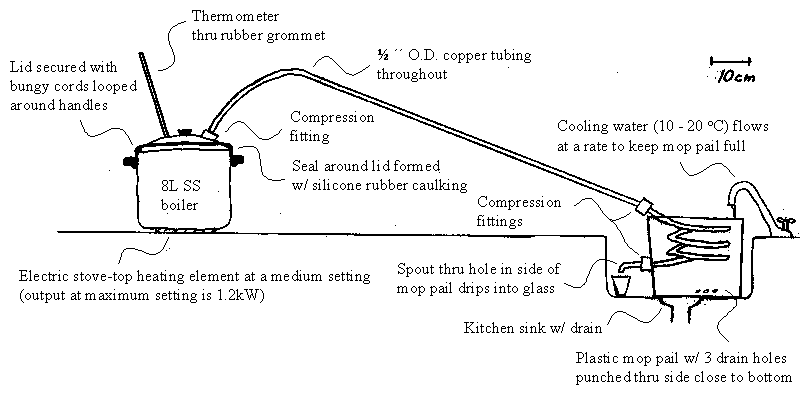
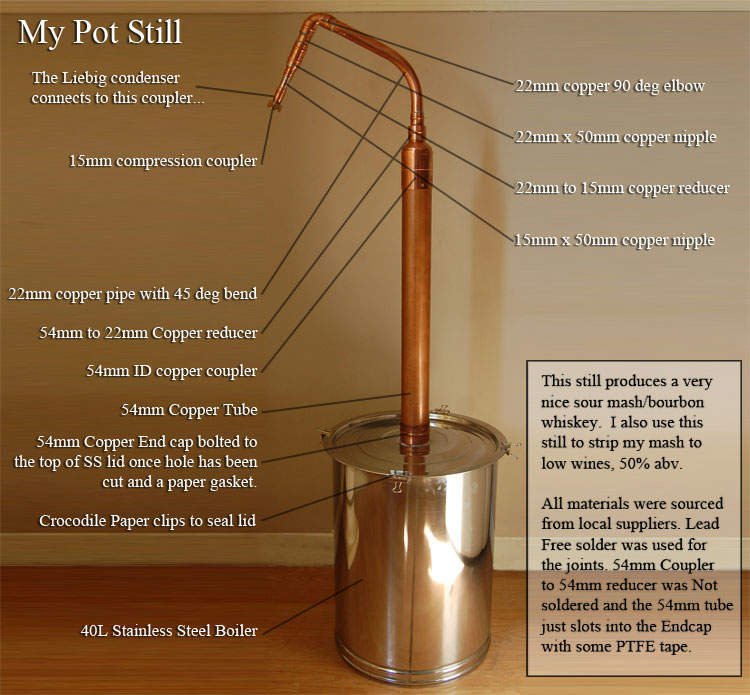
The diagram is from a now defunct New Zealand web page, thankfully I saved it. Although it is half the size I'm going with,it provides all the information to build a working pot still. This ain't rocket science folks, for your tubing 1/4” copper is the bare minimum, the bigger you can use the better. The artist used silicon sealer, I would advise against it.
My first stove top still was made in the early 80's based on the still in the SWAMP from the TV show M*A*S*H and the FOXFIRE BOOK. It worked but it was crappy. Probably because even though I had been making wine for about ten years I didn't know anything about distilling. My dumb ass saved everything coming out of the still, I knew nothing about the chemistry or the toxicity of the foreshots. Thank God I didn't go blind from my early experiments!
From that humble beginning I have played, learned and perfected the art of distilling. My first batches of shine were horrible tasting. In fact they tasted like they had been filtered through a polyester sofa rescued from a house fire! Being the bull headed sumbitch that I am I kept plugging away though. This guide will help you avoid those mistakes. So there, you now know a hell of a lot more than I did when I started.
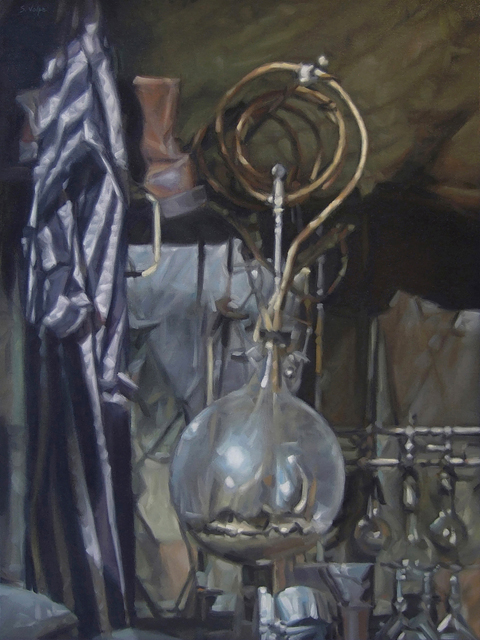
Over time I have had the privilege of meeting some first class moonshiners and benefit from the education they gave me. And I have been allowed to use some large stills. I'm still dreaming of the day when I have room and time to build a 20 gallon still of pure copper like this 10 gallon alembic pot still! I think it's a sin to use this in a landscaping design and if I were to spend $1000 + on a beauty like this I damn sure ain't going to be happy just looking at it!

What are your choices for the kettle of your still? I chose to go the pressure cooker or stockpot style Pot Still. As they are the easiest to convert and be up and running quickly. Then I refined that choice by difficulty in building. Here I'm using a 16 quart Presto with a rocker. This is by far the easiest to make and will quickly revert back to a pressure cooker any time you wish.
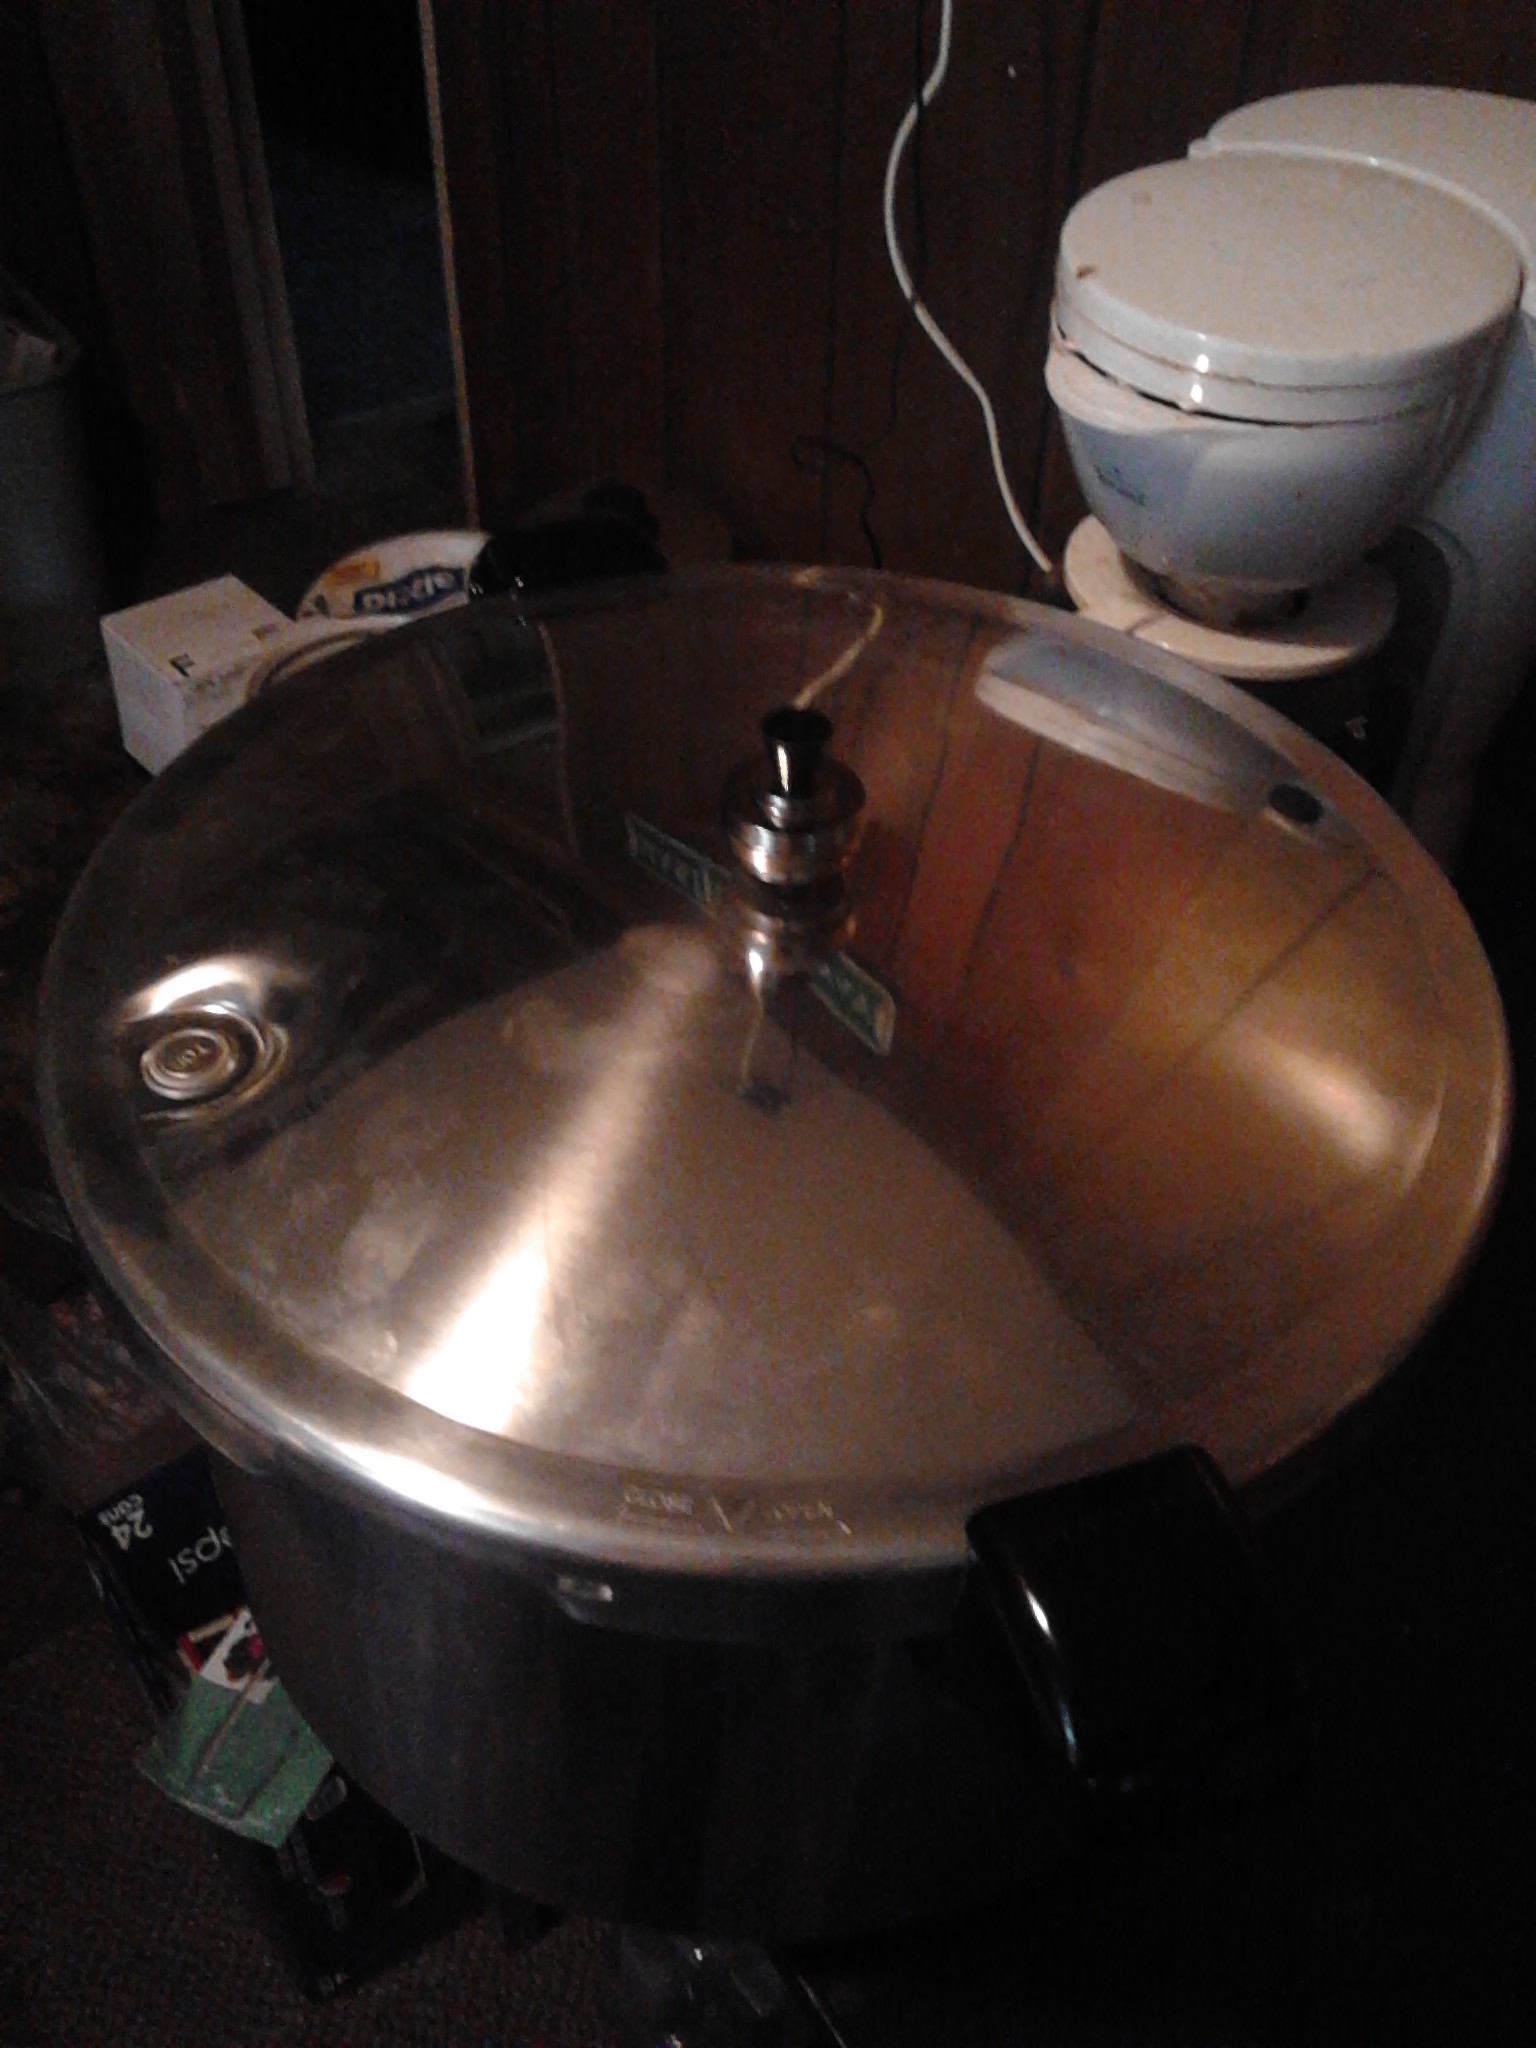
This type has an air vent/cover lock that unscrews for removal. Go ahead and remove it. On the opposite side is a rubber over pressure plug, this is where you are going to insert your thermometer by poking it through. You might have to remove the plug to do this. Save these parts for re-use as a pressure cooker. I left the rocker assembly as is. Most people messing with PC stills remove it and attach their lyne arm there. I’m leaving it functional as a secondary safety. If the rocker is rocking you are using too much heat!
Next we want to make the lyne arm and worm. This is made from 15-20 feet of soft copper tubing. The lyne arm is about 18” straight up and then a bend to about 45 degrees down to your worm that will be in the condenser. I like as long a run as possible because the copper removes sulfites that occur in all fermented mash. It's the sulfites primarily that cause hangover headaches. The perfect still, if such an animal exists is made of all copper for this reason!
You are going to want this to fit inside a 5 gallon bucket. Find something round, a log, bucket, pan, whatever. Take your time and you can roll this without a bending tool. Drill a hole in the bottom side of your bucket for the worm to stick out of and seal with plumbers putty. You could silicon this as no likker ever comes in contact with it just your cooling water. Plumbers putty is cheap and allows you to take this apart and put it back together without waiting for sealant to cure. We will seal the lyne arm to the still with a drilled out cork and if needed a little flour paste.
Have you noticed I have not mentioned a single tool? That is because I haven't needed any in the making of this still! Hey there boys and girls, you now have a simple pot still! See how easy that was? So, if you have a shop full of tools you are itching to play with you might like to try this KIWI's design. It really is a much better still than a pressure cooker! It's just a bit more complicated to build.
Mash
(the fun begins)
I know, now you are eager to use your still! As the saying goes, “ You have to learn to walk before you learn to run.”
No still makes alcohol, they only condense it! So we need some alcohol, right?
The fastest way is to buy a few gallons of cheap wine. Or use the leftovers from that quarter barrel you didn't finish last weekend. Hey, don't knock it, this really works! Sour mash (Jack Daniels) anyone?
Better yet is to make your own. Mash has numerous alternate names, beer, low wines, wash, etc. This is where we begin. All shine starts with this. It's decision time, whiskey or rhum? Your choice. Here are two of the easiest recipes to choose from:
Rhummy's Rebellion Rhum
3 lbs sugar
2 lbs brown sugar
5 pints (80 ounces) molasses
2 Tbl yeast
water to make 4 gallons of wash
OR
Ghetto Sweet Feed Shine (Whiskey)
48 oz corn meal
4 lbs sugar
1 pint mollases
2 Tbl yeast
water to make 4 gallons of wash
Directions
The basic process for creating a mash is to bring your water up to a boil, add in your ingredients of choice. Yes, I said boil but rhum can burn if you bring it to a boil. All grain and fruit based wash's you are going to bring to a boil to release the sugars in the grain and fruit.
Here I'm working on rhum, it's the same for a whiskey except as noted above.
In a large kettle (the PC pot of your still works fine for this) heat about 2 gallons of water to about 150 deg. For rhum the temp. is not overly critical, you want it warm enough easily dissolve the sugar. Very hot tap water is just about right.
For whiskey, bring it to a rolling boil then reduce the heat and simmer about an hour stirring frequently. If making corn likker, dump the cornmeal into the pot first. Start adding sugar a pound at a time until it's all in there. Then add the molasses stirring continually to keep from burning. Add the remaining water to make about 4 ½ gallons. Remove from heat and let cool to about 90 deg. Be sure to stir well before checking temperature.
Now pour this into your fermenter. Add the yeast. Install the air lock and let it ferment for two weeks in a dark location. I've managed that with a paper grocery sack over the fermenter in a pinch. At 70 deg. sometime between a couple of hours and the next day your wash will be bubbling away quite rapidly. At 80 deg. I have had beer ready for the still in as little as five days.
Pay attention to this! Warmer will make this go faster, cooler slower. But too hot and you'll kill the yeast, too cool and the yeast goes dormant.
Ok, I know most of us can't maintain a constant temperature so I'll tell you how I decide when its ready. As the yeast consumes the sugar it shits alcohol and belches carbon dioxide. That ain't the scientific explanation, but I ain't gonna write another dozen paragraphs to say the same damn thing. The CO2 makes the bubbles and when the sugar level drops the bubbling slows down as the yeast eats itself to death. As soon as the bubbling gets slow enough to count individual bubbles It's time to distill into the likker we want.
Time To Distill
Becoming a shiner involves learning the quirks of your still and figuring out just how to run it. Some stills heat up very quickly and cool off quickly, while those that heat up slowly also cool at a slower rate and thus retain heat better. Once you have learned your still you can make awesome shine and never use a thermometer! The old timers didn't use them and if you know your still as intimately as your girlfriend (you damn sure better get that loving with your still!) you wont need a thermometer either!
It's time to transfer your beer into the still. Strain the beer through a t-shirt or cheesecloth and fill your still about 3/4 full.

If
you wind up with too much wash for your still there are a couple of
things you can do with the extra wash. Discard it or just hold it
back and add to the still for a second run. Irish whiskey (Powers and
Jameson) for example are triple distilled. Re-stilling your shine
produces a purer finish by reducing the water content.
However for the home shiner this can be dangerous. The end product of a single run will power a gas engine, each time you re-distill it your increasing the volatility of your shine. That second run is damn near jet fuel! After its cut to a normal drinking strength of about 80-100 proof it is a much better end product. A third run? God help you, your braver than me! I ain't fucking kidding!! Realistically lets just discard it until we have mastered the basic run. Safety first right?
Put the lid on and start cooking over medium heat. There are about as many schools of thought on this as there are moonshiners. Some like to bring the heat up fast and then cut back on the heat. Some say push it as fast as you can on a “stripping run” intended for a second run through the still. Due to the boiling points of the various elements coming out of the still, I'm of the school of thought that slow and steady is better for getting the foreshots (this is poison) off. Then I keep checking the temp and let it rise slowly through the rest of the run. Remember we have a thermometer in use so keep an eye on the temp and KEEP TOUCHING THE STILL AND THE LYNE ARM WITH YOUR HAND. Learn what the still feels like at all stages of the operation..
Cuts
FORESHOTS (poison)
• Acetone:
134 degrees Fahrenheit
• Methanol (wood alcohol): 147
degrees F
HEADS
(saved for next run)
• Ethyl acetate: 160 degrees F
HEARTS
(this is what we want!)
•
Ethanol: 172 degrees F
•
2-Propanol : 180 degrees F
TAILS
(saved
for next run)
• 1-Propanol: 207 degrees F
When the thermometer is getting close to 134 deg. Your first drips will begin. This is the foreshots, now you are distilling! The foreshots will be the first thing out of the still and are pure poison. They smell like industrial solvents because that is what they are. Foreshots are roughly 0.25% of your mash. That's a little less than one ounce per gallon of wash. My rule of thumb is ruthless. I don't give a damn about the math, throw out the first TWO ounces per gallon. For this 16 quart still that is the first eight ounces from the still is discarded. I find a Pyrex measuring cup perfect for grabbing foreshots. I don't want my nose getting desensitized by this shit so a measured doubled cut is easy to monitor just watching the cup fill. A cup later swap out your collecting jar and smell and taste the drips. You just made the first cut. At this small scale I like collecting in half pint jars if I have them. Let them fill and then cover and set aside.
Don't forget to mark the jars, you don't want to mix the heads and tails with the hearts and ruin the taste.
Next up is the heads start running at about 160 degrees. Heads are mostly good alcohol but with some lingering foreshots still mixed in. Here is where smelling and tasting become important. You want to save this for your next run. Because you will only be tasting a drop at a time it is safe. Again, I cannot emphasize how important it is to learn the tastes and smells of your shine through the entire process. Four oz. Should be enough. At that point the drips will change flavor and smell. And the thermometer will be nearing 170 degrees.
This is now the hearts. The good shit my friends! Nuff said.
Collect everything until the thermometer reaches 200 degrees.
Pat your self on the back, you just made your first moonshine!
You are almost done. All thats left is the tails. Keep collecting distillate until the temp reaches about 200 degrees.
Shut off the heat let everything cool down and clean up.
There you have it. Soon, I hope to have a video made to go along with this tutorial, stay tuned!
I want to thank Henry for this fine site and Digger and Apple for goading me into this project. For all the frustrations involved in the writing of this tutorial, the experimentation with mini stills, the brain freeze when I couldn't think, the writers block when I knew what I wanted to say but couldn't type a coherent sentence to save my ass has all been worth it! Thanks guys!
QUESTIONS?